Sources setup
The software supports data from recorded File source or live input sources.
One can setup the source type by either selecting “Setup”->”File Source Setup” or “Setup”->”Input Source Setup”.
Tip
Once the source have been setup, one can toggle between them by selecting: “Setup”->”Toggle Source”
Read rate
All source have a “Read rate” setting. This is the frequency with which data is read from file/input hardware. It is also the update rate of the plots (and associated analysis).
A source setup can be loaded from a (.sava) setup file by selecting “Load setup”.
File source
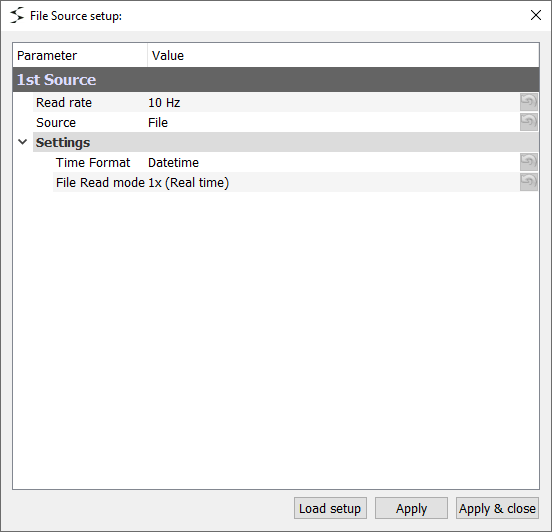
File source setup
For file sources the following can be set:
Time format
The display format in the toolbar file overview.
File read mode
How fast the data is read from the file. The following options are available:
1x: Playback time is the same as original recording time
Fast: As fast as possible (limited by amount and type of plots)
2x: Double 1x
1/2x: Half of 1x
1/10x: A tenth of 1x

File Source Setup Dialog
File Toolbar
When the file source is selected, the File Toolbar is visible in the button of the main window.
By pushing “Load File” one can browse data files. See File Formats section for supported input formats.
When a file is loaded an overview of the data (heavily down-sampled) is shown on the toolbar. In the overview the region on interest (in time domain) can be selected. When Stating the file source only this region will be processed. To select all time: “right click”->”Select all”
Closing a file
The file is closed when either closing the software, loading another file or manually by “right click”->”Close file”.
Exporting data
The selected data region can be copied to a new HDF5 file or exported to various other formats by “right click”->”Export selection”. See section Exporting.

File Toolbar
Input source
The sotware currently handles two main categories of live input sources:
NIDaq: National Instruments Data Acquisition Devices
External Source Module: Custom Python script
Multiple sources
Multiple sources can be added in parallel, by pushing “Add secondary source”. The sources are running completely independent, with each own sampling frequency. They are only synchronized on source start. All sources will be recorded to the same data file. This feature should not be utilized to compare high frequency sources. But is convenient when mixing high and low frequency signals.
A source can be removed, by “right click”(on the source name)->”Remove”.
A source can be (re)named, by “right click”(on the source name)->”Rename”.
National Instruments daqs
To communicate with the NI hardware the NI-DAQmx driver is required.
The software supports the following analog input types from NI devices:
Voltage
Current
EIPE (ICP,DeltaTron)
Thermocouples
RTD(PT100)
Strain Gauges
All NI data acquisition devices that is supported by the driver is supported by the hardware.
Setting up NI devices
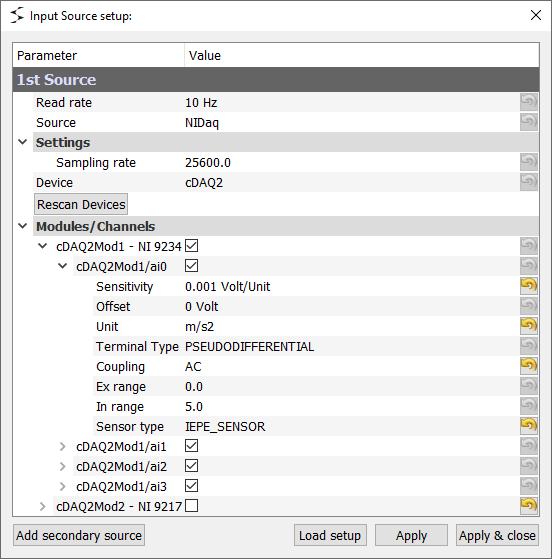
To setup a NI device, select “NIDaq” as “Source” and push “Rescan Devices”. This will search for connected NI devices. If a device does not show up, check if there is an issue with the device in the “NI MAX” software. If using Network attached devices it is necessary to configure them first. Select the device from the “Device”-list.
The available sampling rates will depend on the selected channel types.
Under “Modules/Channels” the device modules (if multi module device) and channels will show. Each module/channel can de activated/deactivated by toggling the check-mark.
Under each channel a number of settings will be available. The available settings will depend on the channel type (see the NI documentation). However the following settings, to convert from electrical unit (fx Volt) to the sensor unit (fx. m/s2), will always be available:
Sensitivity: The sensitivity used in the conversion
Offset: The offset used in the conversion
Unit: The display sensor unit of the channel
Conversion example
Sensor Unit = (Offset+voltage)/Sensitivity
A channel can renamed by “right click”(on the channel name)->”Rename”.

Input Source - NIDaq
External source module
The software is able to load a custom Python script in runtime and use it an external source module. This can be utilized to acquire data from other daq equipment, custom hardware, network sockets, other file-types etc.
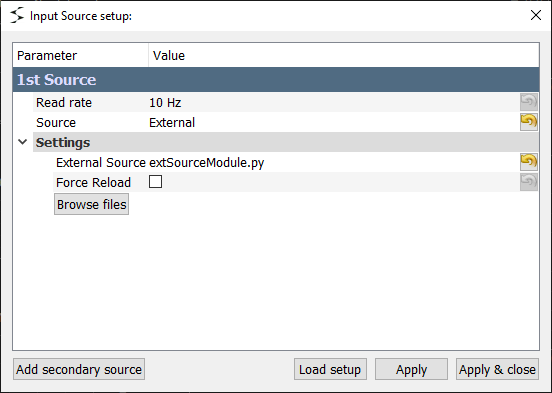
Setting up an external source module To setup an external source, select “External” as “Source”.
Select a file by either entering the path in “External Source” or browse for the file, by pushing “Browse files”. The path can be absolute or relative (to current directory).
Tip
An example of external source module (“extSourceModule.py”) is located at: “Help”->”External Module Examples”.
The external source module has to have a specific format. The “external source class” must be named the same as the module. See the “extSourceModule.py” example for reference.
The external module will automatically be reinitialized if the file has been changed. The “Force Reload” setting forces reinitialization on every start (for instance if secondary file or a remote server has changes).

Input Source - External